


I am in LOVE with how easy it is to make my own IKEA Inspired Paper Lantern with my Cricut Explore Air 2.
I love lanterns, Maybe, because they remind me of times long past when the light of a flickering candle was the main source of light after the sunset in the sky. There is something about a candle that is soothing, romantic and even magical, which is probably why I have soo many in my home.

Recently I decided to stretch my designing abilities to see if I could figure out how to design my own hurricane lantern inspired by the ones sold at IKEA that I could make out of simple Cardstock and Vellum with my Cricut Explore Air 2. It took me a while to design (for I wanted to make it easy to cut and assemble, even for paper crafting beginners.)

I love how the lanterns turned out. I made the bottom so you could open and close in case you wanted to use it as a gift box or to wich out the electronic tea lights in. My daughter claimed the first one I made to use as a night light in her room, and my mother loved them so much she had me make her two for her mantle. I think I may even make a set for my Valentines Decorations that I’ll decorate with vinyl.
Materials Needed:
- Cricut Explore Air 2 (or other Cricut Cutting Machines that work with Design Space)
- The Paper Lantern SVG Cut file
- Strong, Standard and Light Grip Mats
- Fine Point Blade
- 1 (12x12in) Sheet of White Linen Cardstock
- 1 (8.5x11in) Sheet of Vellum
- Cricut Essentials Tool Kit
- Glue Stick

Instructions:
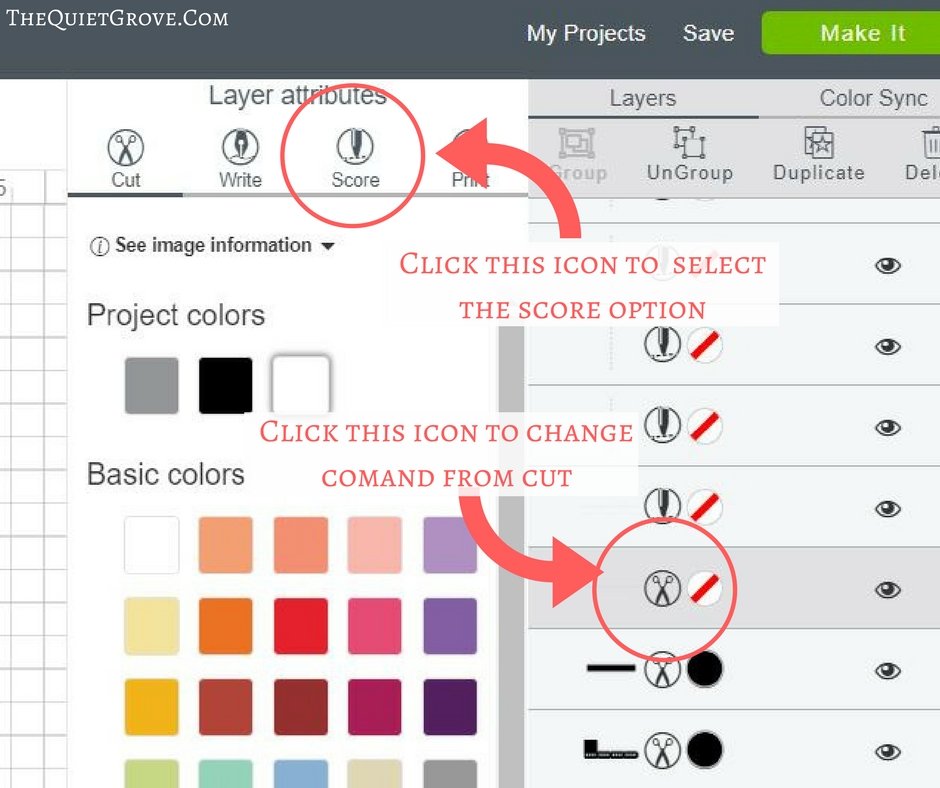
- Upload into Design Space and change all the lines to score marks by clicking on the scissor icon in the layers section in Design space and then selecting score tool.
- Click on the lantern design and then click on “attach” button to make sure the score marks are attached to the lantern design.

- Click Make it and load your Score tool into your Cricut.
- Then Load your mat and get cutting. You will want to use a light grip mat for your vellum and standard grip mat for the cardstock,

- After you are done cutting, carefully peel your mat off your design (so you don’t curl the paper)
- Fold the cardstock on the scored lines.

- Use a glue stick to attach the vellum windows on the inside of the Cardstock lanterns.

- Next glue the lantern together via the tabs. I like to assemble the upper part (minus the handle), then the bottom main part. Then, I carefully glue the top part to the bottom.

- Fold the handle on the score lines then attach to the top of the lantern with glue.

- Last of all just put in your favorite electronic tea candle and enjoy.
I am so excited to share with you my tutorial for making these adorable Ikea Inspired paper lanterns as part of the Inspire My Creativity Monthly Link Party that I will be co-hosting along with some of my favorite fellow crafty bloggers on the 2nd Wednesday of each month! Make sure to check out the other great projects for this months link up (found at the end of the post) and don’t forget to share your own projects with us.

Co-Hosts
Next Month’s theme is going to be Dollar Store Craft. It is amazing what fun DIY crafts you can make with inexpensive Dollar Store Items. I invite you to check back on the 2nd Wednesday in February (Which incidentally falls on Valentines Day this year) to see what I will be making for my Inspire My Creativity Craft. Oh, and you are welcome to join in the fun and link up your craft as well. I would love to see it!

Christine (@Chrissy4sfsn)
Tuesday 30th of January 2018
What a darling lantern! I love that you used your Cricut too - all those awesome precision cuts. So cute!
Julia
Tuesday 30th of January 2018
Thank you. I had soo much fun designing it.
Marie
Friday 19th of January 2018
What a great design! I'm thinking of all the different colors and holidays this can be customized for.
Julia
Friday 19th of January 2018
Glad you like it.
Aliza Hale Biorn
Thursday 18th of January 2018
This lantern is so pretty! I might have to make some of these as decorations for an upcoming activity.
Pam Larmore
Sunday 14th of January 2018
Very pretty! I have a Cricut Maker and love it!
Jaclyn B
Sunday 14th of January 2018
I got a Cricut for Christmas!!! I'm still learning how to use it, but I love these lanterns!