


Wanna make a 3D Eiffel Tower?

This last year I was asked to make centerpieces for 2 of the tables at Cricut’s first Makeathon. Each table was themed and one of the themed I was assigned was Travel/ Wanderlust. I was told that I didn’t have to use my Cricut to make a centerpiece I could use anything as long as it fit my theme. However, after dragging my hubby and kids to 3 different stores and not finding what I was hoping to find for my centerpiece, I was sooo frustrated. My husband seeing this, turned to me and suggested I make something with my Cricut.

We started brainstorming and I thought maybe we could make a 3d Eiffel tower with some cutouts of other great monuments to sprinkled around it. I asked my talented husband for some design help for the centerpiece object before. We decided to cut out the Eiffel Tower out of Silver Glitter Cardstock with a solid vellum inner lining so that we could place an electronic te light inside and have it glow. My husband also designed a circular stand for the Effile Tower which has silhouettes of great monuments around the world.

To make sure the design would work I actually made a full mock-up in plain white and black cardstock (and vellum) first. Once we saw it worked we then made the official version with glitter cardstock ( white linen cardstock and vellum) to give it a bit more glamor. My daughter claimed the mock-up and had been using it as a night light ever since. This last month we used her White Eiffel Tower mock-up as part of the decorations for her Paris and Poodle party.

After Sharing about this project on my Instagram account, I had a lot of people message me for the Cutfile and instructions to make their own. So, for those who would like to make their own 3d Eiffel tower here are the instructions.
Materials Needed:
- Cricut Explore Air 2 (or other Cricut Cutting Machines that work with Design Space)
- 3d Eiffel Tower SVG
- Cricut Essentials Tool Kit
- Strong, Standard and Light Grip Mats
- Fine Point Blade
- 4 Sheets Silver Glitter Cardstock
- 4 Sheets of Vellum
- Glue (I used Crafter’s Precision glue fine tip.)
If you need to order any of these supplies from Cricut.com use Promo Code: QUIETGROVE to get 10% off + free shipping!!
**Note this code does not work on Design Space Access, digital content, machines, EasyPress, Brightpad
Instructions:
- Download my Eiffel Tower SVG Cut File and import it into Design Space
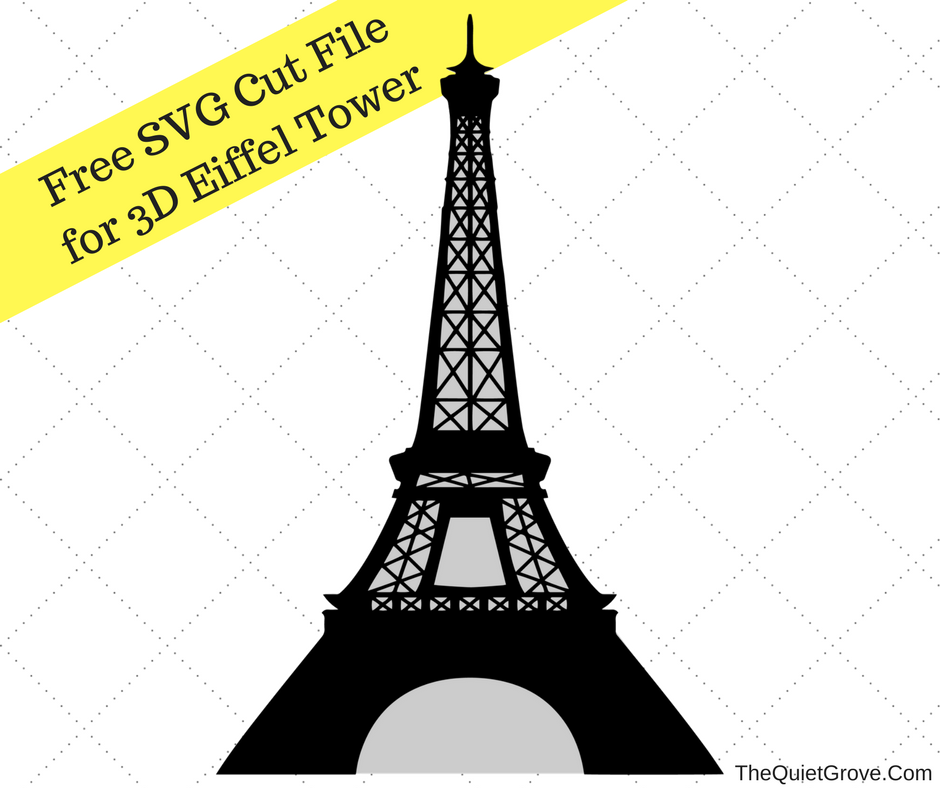
- Size the Eiffel Tower design to 6.856 in Wide x 10. 239 In High and then copy 4 times

- Set the Cricut dial to Custom Materials and select Vellum on custom materials drop down

- Place Vellum on Light grip mat and start cutting.

- Remove the Vellum by peeling the matt from the vellum
- Select Glitter Cardstock on the Custom materials list, then place cardstock on standard grip mat and start cutting.

Peel the mat from the cut Cardstock and use weeder to pop out any tiny cut pieces.

- Glue each vellum piece to the inside of the cut cardstock wall and let dry

- Glue the inside outer edge of one wall to the next.

- Once glue hardens carefully roll the outside of the piece lengthwise before gluing the next side on.

**Its a tight fit to get all for sides glued together but it looks fantastic when it’s done!

LIke I said. I originally made this Eiffel Tower (along with the base & Travel Tags for the Cricut Make-A-Thon table centerpiece. However, I have also used it as a decoration for my daughter’s Birthday party on a dessert place and my daughter uses it as a night light in her room. It really does look stunning in person and wasn’t hard to make!

If you liked this post then check out these: (Click on the photo to go to the post)


Toni
Thursday 28th of April 2022
Thank you for sharing. I love it, although it took some practice getting all the sides glued together. On my first attempt, I mistakenly only glued 3 pieces together and used foil card stock which looked pretty but shows wrinkles. I'm not defeated, I'll keep trying.
Chelle Chapman
Friday 18th of May 2018
LOVE this project!!! Thanks for sharing your creativity w/ us!!
Julia
Sunday 20th of May 2018
Awww, I am glad you like it. I love how it turned out as well.