
DIY Beanie Boo Headbands Made with a Cricut Maker

Who want's to learn how to make your own Beanie Boo Headbands?

This year for my daughter's 9th birthday party she requested a Beanie Boo Adoption Party. For the party we thought that in addition to adopting those adorable little stuffed animals we would make Beanie Boo Animal headbands for the kids to BECOME Beanie Boos. It took me a bit of research before I got to work designing the headbands, but was happy with how easy they were to make and how cute they turned out in the end.
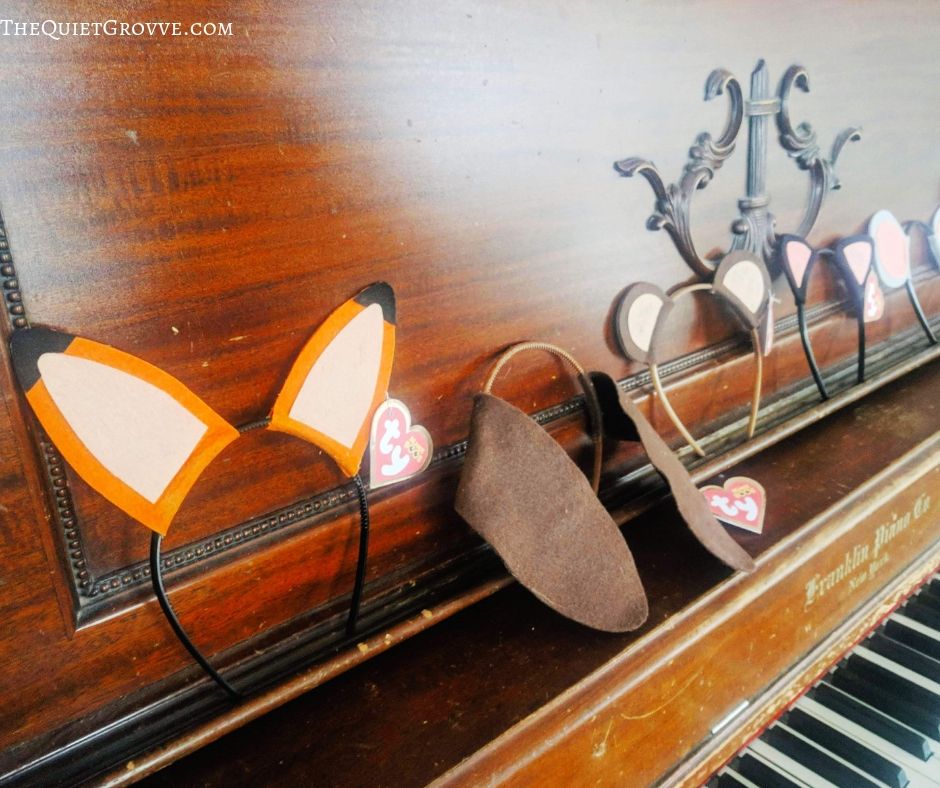
I used my Cricut Maker (and Rotary Blade) to cut all the Felt. And then a Hot Glue gun to attach the ears to the cheap plastic headbands to make the various animal headbands. We had 6 kids and I wanted a different animal for each kid so I designed a variety. I designed a fox for the brithday girl as well as deer, mouse, dog, cat & bear. They only one that I found tricky was the dog (which I ended attaching different so the ears would flop over.)

For the Beanie Boo tags, I looked online to find the standard TY tag design that I recreated in Design Space (as a Print and cut image. I make the tag front and back separate so I could have a "Thanks for coming to my Beanie Boo Birthday Party Message" on the inside. *If I was making the tags for a Halloween costume I would just edit the text on the tag (you do this by unflattening the tag, changing the text, then reflatening so you can print & cut)..
DIY Beanie Boo Headbands

I designed these Beanie Boo Headbands for my daughter's Beanie Boo Birthday Party (though you could make them for a Halloween costume as well.
I designed 6 animal headbands (Fox, Deer, Mouse, Cat, Dog, and Bear) that are available on the Design Space Canvas linked below.
Materials
Tools
Instructions
Instructions for Headband
Open Cricut Design Space Canvas for Beanie Boo Headbands -->HERE<--
Click Make it and select Felt as the Material to cut
Switch the fine point blade for the scoring wheel
Use the brayer to firmly attach 12x12 felt square to fabric mat and load into the machine to cut.
Carefully remove cut felt from the mat with the broad tip tweezers and repeat for next color until all felt pieces are cut out.
Using Hot Glue gun glue the decorative inside part of the ear to the front earpiece (like the pink of the mouse ear)
Next glue the (top part) of the front and back felt ears together leaving the bottom rectangle tab open.
Add glue to headband where you desire the ear
Open bottom tabs of the felt ears and place over hot glue on plastic headband
Fold tabs around the headband and use glue to attach on the underside.
(*for dog ears you glue the inside decorative part of the ear onto the main ear then place glue on inside and outside of the headband (where you wish the ears to be) and starting with the tab wrap the ear around the headband so the flop forward.)
Add Beanie Boo Tags and Enjoy!
Instructions for Tag
Open Cricut Design Space canvas for Beanie Boo Tags -->HERE<--
Click to Make and set material to Cardstock
Send the file to your inkjet color Printer
Place on standard Grip Mat and load into Cricut Machine. (and switch the fine point blade for the scoring wheel)
After done scoring, change tool back to fine point blade to cut out tags.
After cutting out front and Backs of the tags change material to Adhesive Foil
Place adhesive foil on Strong grip mat and load into the Cricut.
Fold the tab on the score line (back tag piece) and glue to the inside of the front tag (lining up the hole)
Place the adhesive foil heart outline on the front of the tag.
Attach the tag to the right ear of the animal headband (using a needle and white thread.)
Notes
I used a downloaded TY Font for the tags so they looked like the official Beanie Baby tags. You will need to download the font & install it on your computer before opening the Design Space canvas for the tag.
Get the free font -->HERE<--
Recommended Products
As an Amazon Associate and member of other affiliate programs, I earn from qualifying purchases.





I placed the headbands on the piano near the front door so that as each child arrived they got to pick which headband they wanted. The headbands were such a hit with the kids. I have to admit they were super cute wearing them.
If you liked this DIY Post them check these out: (Click on the photo to go to the posts)


What font did you use in the design space to make the tags?
Oh I had it in the note in the tutorial " I used a downloaded TY Font for the tags so they looked like the official Beanie Baby tags. You will need to download the font & install it on your computer before opening the Design Space canvas for the tag. Get the free font -->HERE<--?