
DIY Chinese New Year Banner (made with Foil Iron-on)

Are you looking to make some last-minute Chinese New Year Decorations?

I love Chinese New Year. We always have fun celebrating as a family. Since this year I will miss the main party (since my husband and I are overseas on an early 10th Anniversary Trip.) so we had a sort of early Chinese New Year party with my family before we left.
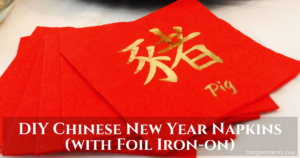
I decided last minute to make some cool Year of the Pig New Years Decorations for the party with my trusty Cricut Maker and I Love Love Love how they turned out. For the decorations, I decided to go with classic Red and Gold with White as an accent color to make the other two pop. Since the party was a last minute thing I didn't have a lot of time to design or make anything. Thankfully Cricut Design Space already had cool designs in their Cricut access for Chinese New Year that I was able to easily use and modify to fit what I wanted.

First I wanted a Banner as a backdrop for our food table that would be filled with our favorite Asain entrees After making the banner I decided to make some accompanying year of the pig wall art made with the same Dark Red Cardstock and Gold Foil Iron-on as the banner.
For those wanting to make this Banner with accompanying wall decor for another Chinese New Year Zodiac, I have included in this post the canvas links for all 12 of the Zodiacs.
Materials Needed:
- Cricut Maker (or other Cricut Cutting Machines that work with Design Space)
- Cricut Design Space Canvas for your desired Chinese New Year Banner (rat, ox, tiger, rabbit, dragon, snake, horse, goat, monkey, rooster, dog, and pig.)
- 12 x12 Standard Grip Mat
- Fine Point Blade
- Cricut Essentials Tool Kit
- Gold Foil Iron-on
- 5 Sheets (12x12) Red Cardstock
- 6x7 Easypress 2 & Mat
Instructions:
- Open up Cricut Design Space Canvas for your desired Chinese New Year Banner & Wall Decore--> (rat, ox, tiger, rabbit, dragon, snake, horse, goat, monkey, rooster, dog, and pig.)

- Click Make it Button and Select Cardstock as the Material to cut.
- Place the Red 12x12 Cardstock on a Standard Grip Mat and insert into the Cricut to cut.

- Once cut carefully remove the cardstock from the mat (**by peeling the mat from the cardstock so as not to overly curl the cut cardstock.)

- Once all the cardstock is cut, change the material to Foil Iron-on (custom material.) and make sure the mirror Image button is selected for all the Iron-on mats.

- Place Iron-on shiny side (colored side) down toward the mat. and insert into the Cricut to cut.

- After cut use the weeding tool to weed out unneeded iron-on

- Heat the Easypress 2 to 270 and set time for 30 seconds.

- Place the Cut Iron-on design on each piece of the Banner, then press with the Easypress 2 (using the easy press mat underneath) with firm pressure for 30 seconds.

- Then peel off the protective backing off the iron on (Cricut recommends letting it cool first for a “cold peel”)

I really love not only how quick and easy this Red and gold Chinese New Year banner turned out. The gold Iron-on gave that sort of professional embossed foil look that was just stunning. My family loved the decorations so much they decided to use them again for their actual Chinese New Year party with friends. I will probably make this banner and wall decor for all 12 of the zodiac signs so I can use them every year.

If you liked this post then check out these: (Click on the photo to go to the post)





Hello!
This is a great project!
I tried accessing it in the Cricut Design but it says that the project is saved as private.
Is there a way I can access it or purchase it?
Thank you.
Sorry when Cricut transitioned from cloud-based to desktop some of the design space links got broken. I have been working on getting them updated. The link in the post should work now.