


Welcome to my DIY Harry Potter Christmas

Christmas has always been one of my favorite times of the year. Last year due to traveling over the holidays our Christmas was very different. Our decoration consisted of some simple Christmas window clings and Christmas word fridge magnets that I made with my Cricut before heading off our adventure. We ended up sending Christmas in an Air bnb in Athens where the owner was kind enough to leave a few Christmas cookies and a small decorated tree on the table for us. Come Christmas morning each of us had a small stocking (that I have packed away with our few decorations) filled with local chocolates and a simple gift. Yes, last year Christmas was indeed simple yet still special.

This year our kids asked if we could spend Christmas with family. They also begged for us to go all out with decorating. Ok, they didn’t have to ask very hard because I rarely need an excuse to decorate. The thing is, our Christmas decorations were buried in storage as were my in-laws.

Thankfully I have a Cricut Explore Air 2 and Crafting supplies that I was able to call upon (as well as some Black Friday deals at Hobby Lobby, JoAnn’s and Michaels). Since I was going to be making our Christmas decorations, I figured it would be fun to do a Harry Potter Christmas. Which to be honest is something I have wanted to do for like forever.

I had huge plans but had to keep it more simple due to getting sick. Though I am super happy with what we ended up with. The main focal point of our decorations was, of course, the Christmas Tree. So I knew I needed to do it right. I didn’t have the money or materials to get/make a sorting hat for the tree topper like most do so I borrowed an owl from my sister (who got it years ago for a Harry Potter party) Next came some sparkly Gold ribbon with a few golf sparkly feathers. After all, I wanted my tree to sparkle and shine. Last of all came the ornaments.

I knew I wanted to have some golden snitch ornaments as well as flying keys. Unfortunately, most of the tutorials out there used materials that were a bit out of my budget. So I designed my own. The Flying keys I made with layered Black cardstock and Glitter Cardstock. Get the Full Tutorial Here.

For the Golden Snitches, I got gold ball ornaments from Hobby Lobby on black Friday sale and designed wings that I cut out of Gold Glitter cardstock. Get the Full Tutorial Here.

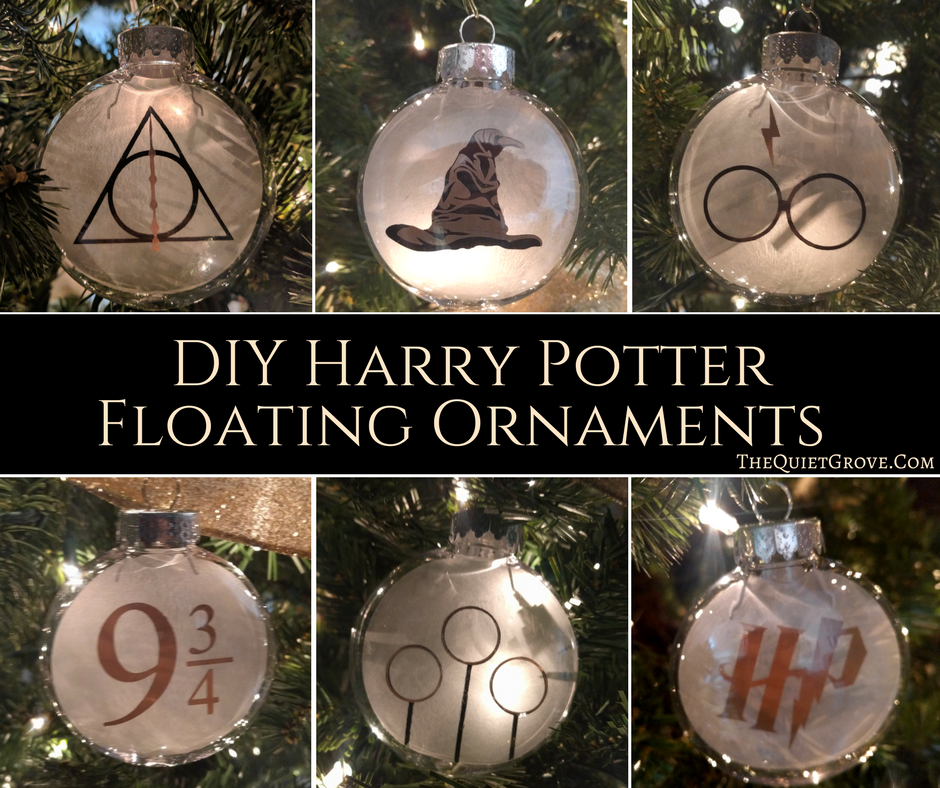
Next, I made some Harry Potter graphic floating ornaments. These I made with clear plastic ornaments that I put a cut out of Vellum (with the Harry Potter Designs cut from both Vinyl and Gold Adhesive Foil) inside. Get the Full Tutorial Here.
Lastly, to fill in the tree a bit more I made some simple Stars and Moon Ornaments out of layered White Cardstock and Glitter Cardstock. You can get the Design Space Canvas here. Then all you do is glue 3 layers of white Cardstock and an outer layer on both sides of Silver Glitter Cardstock (and don’t forget to line up the holes in the top to be able to hang the ornaments.)

Now that the tree was done I thought it would be nice to make a Harry Potter Christmas Wreath where I took a plain Green Garland and added some twinkling white lights, and for the Harry Potter touch I attached a plastic snitch I borrowed from my sister and cut Happy Christmas in Gold Glitter Cardstock with my Cricut you can get the SVG cut file here. Then just upload and size according to your wreath.

My inlaws have a large mirror hanging in the upstairs hallway so I cut out of Black and Gold Window Cling a fun “May Your Christmas Be…Magical” The first part of the message I used the Lumos font found here. and for the Magical I used the Harry Potter font mentioned earlier. Cricut Design Space will work with any of the fonts on your computer so all you have to do is download and install the fonts. open a Design Space canvas, and type up the phrases selecting those text. Then Cut.
**If you mirror the image then you can use the backing like transfer tape to make it easier to stick it on the mirror.

For the last of the actual decoration in the front room (in addition to some garland we were able to dig out of storage and lights.) I cut out this fun Christmas village out of White Window Cling and hung in the front windows. Unfortunately, I only had the frosted window cling which worked well, but I am sure it would have looked even better if cut from solid white window cling. Get the Canvas Here. You will just need to adjust the sizing for your window size.
**Again, if you mirror the image then you can use the backing like transfer tape to make it easier to stick it on the mirror.

For the final touch, we decided to wrap all our Christmas presents in brown paper and string as well as fun Hogwarts wax seal sticker that I made with Cricut’s Printable Vinyl. you can get the PNG for the Print and Cut stickers here. Then just upload the png image (select complex image, then print and cut option, then size to how big you want and duplicate for as many as you want. After that, you just print our on your color printer and load into your Cricut to cut out.
.

Like I said I was planning to do more, but in the end, we were all very happy with what we ended up with. What do you think?

If you liked this post then check out these: (click on the photo to go to the link)

